In 1988, while canoeing down Manitoba’s Pigeon River in early spring, our partners in the other canoe dumped. There were many little rapids, one of which tripped them up. The tactical details are unimportant, but on shore below the rapid, we found that we had 2 paddlers and one canoe of dry gear, and (due to inadequate waterproofing) 2 paddlers and one canoe of very wet gear. We lit a large fire against a rock wall and fended off hypothermia, but as the sun went down it got quite cold, and we’d have been faced with the prospect of a very unpleasant night, save for one thing: as part of our equipment we had a wall tent with a wood stove.
After setting up, we sawed a larger than normal supply of stovewood, hung the wet gear from the ridgepole, and kept the stove going all night. It was early May, and outside the temperature dropped — there was frost. Inside, those who were wet stayed close to the heat, slept reasonably well, and by morning all the hanging clothes and bags were dry. A grim experience had been turned into one we could joke about.
|
[click to enlarge] |
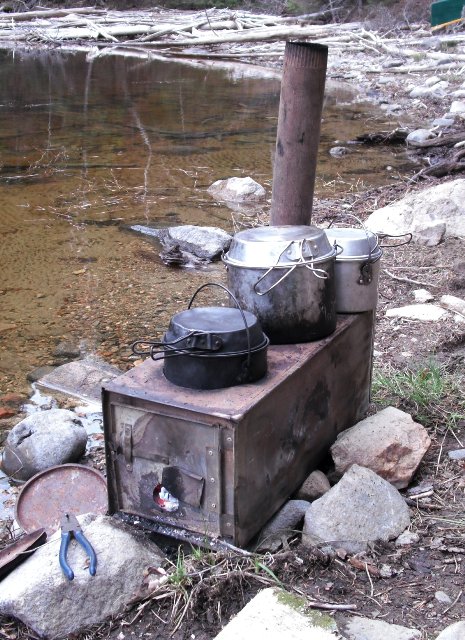

My small portable wood stove weighs 11 pounds, including the stove pipe, which fits inside. It’s a practical, multi-purpose way to be self-sufficient in the bush. As well as being used in a wall tent set-up, it works with a Campfire tent or other lean-to. It’s more labor than zero-trace camping, but it’s vastly more comfortable, and feels much more like home.
It’s the only proper way to go winter travelling. It heats the air, dries your gear, and cooks your food. It makes camping luxurious, and on a long trip it’s lighter than the bottled fuel you’d carry for a gas stove. Also, you’re much more a part of the bush when you depend upon it this way. You are not relying on a fossil-fuel industry or a complicated piece of machinery. It isn’t zero-trace, but it uses far less wood than an open fire, and doesn’t scar the site like a fire-pit does. It’s easy to cook on, and smoke doesn’t get in your eyes. It’s a piece of gear that helps make you a little more independent. The only real negatives I can think of regarding it are that it’s too heavy for a backpack trip, some heavily travelled routes might not have much wood left, and if you drop plastic clothing on its hot surface, you’ll wish you hadn’t.
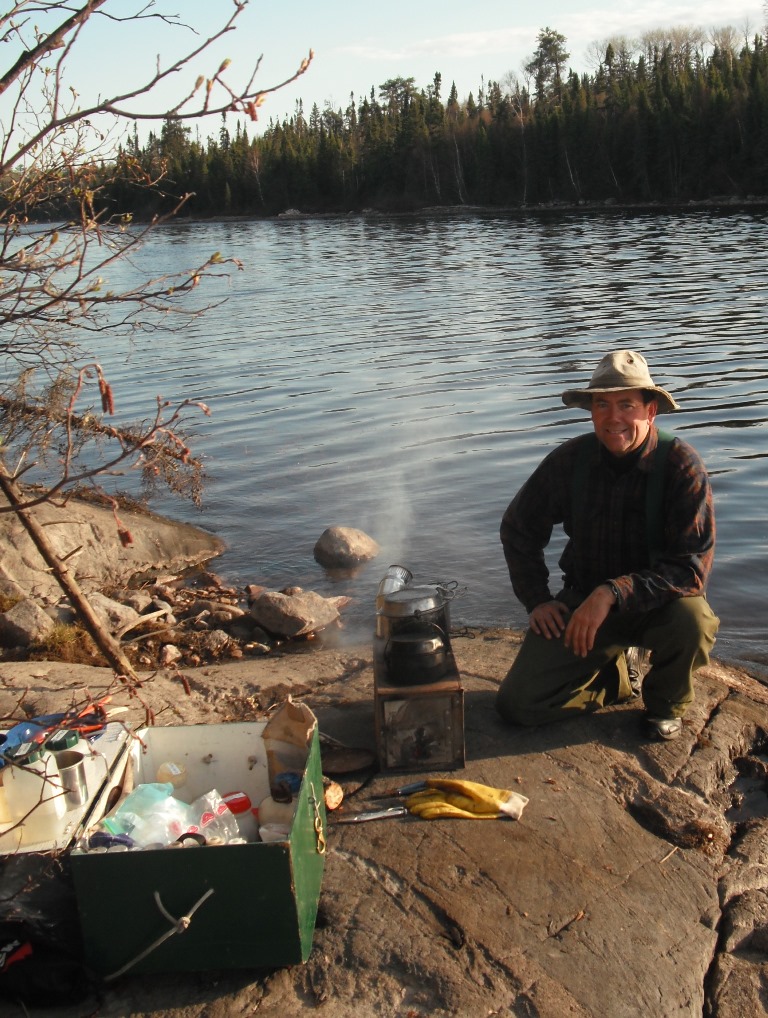
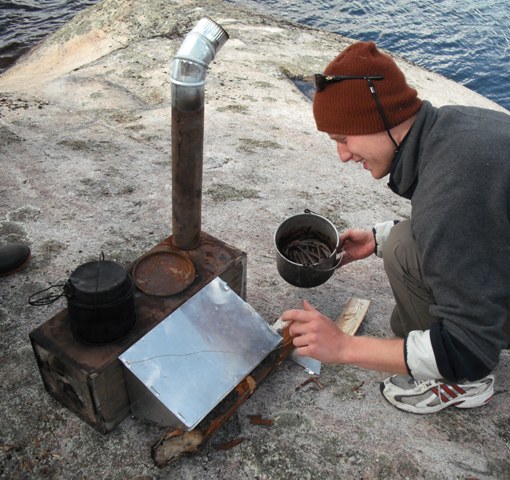
But I also use it on canoe-trips. I set it up outside, on rocks or an outcropping. It’s a very efficient cook-stove: 4 or 5 things can be cooking/heating/toasting at once. [In this photo we’re cooking my daughter’s 21st birthday cake.]
Ethics
A wood-stove is obviously not zero-trace. It may not be appropriate for your local conservation area unless you bring your own wood. In fact there are lot’s of Parks, or heavily-travelled routes (West-Coast Trail, Bowron Lakes, Adirondack Trail) where it’s not a good fit. It’s a piece of Northern kit. It’s designed to function for months — without buying fuel. It’s easiest to use where jack-pine grows — and the Shield-forest contains millions of cords of that.
If it doesn’t feel right to be setting up this stove and cutting wood for it, then don’t do it. Go farther north.
Disclaimer
This stove is UNSAFE in a house or garage or other structure of that type. It will render your insurance void. It is not CSA-approved. Use at your own risk. It is designed to be used in a temporary northern tent or similar shelter, with someone in attendance, watching it, at all times. Use of this stove is entirely the responsibility of the operator. The writer of these plans David Hadfield, and his estate, accepts no responsibility for the operation of this stove.
Size
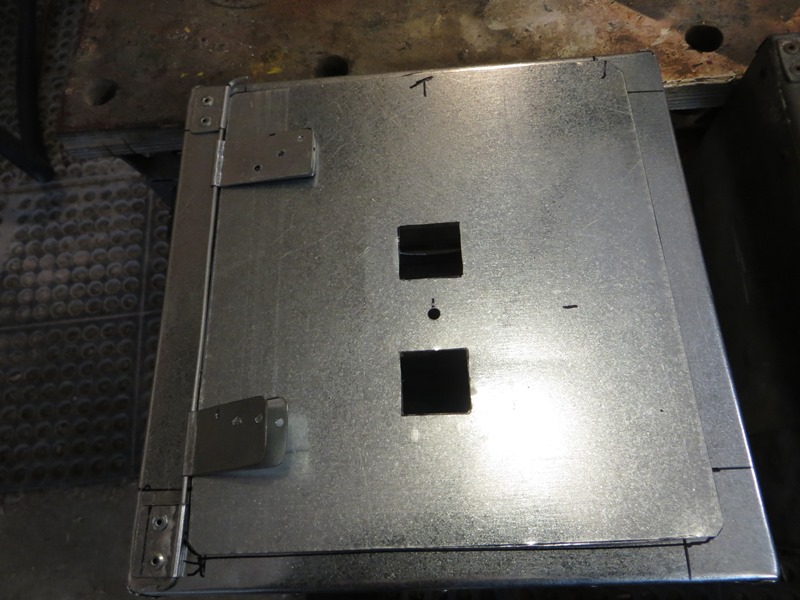
On spring and fall canoe trips I use a stove 9″ x 9″ x 22″ with 5 sections of 3″ pipe plus an elbow. This package, made of 26 gauge steel, weighs 11 lbs and can overheat an 8′ x 10′ wall tent. You could get away with slightly smaller for Spring and Fall trips.
A larger cross section needs a larger stove pipe, and I have a 12 x 12 x 26″ unit made of 22 gauge, with 5 sections of 4″ pipe plus elbow, and it weighs 21 lbs.
You have to decide if you want to keep a fire going all night. In winter you have the choice of carrying only a summer sleeping bag and keeping the fire stoked, or letting it die out and carrying more bedding. I opt for the latter. I use 2 down bags rated to minus 5 degrees, sandwiched. When I go to bed in the warm tent I start out with 1 layer above and 3 below. As the stove cools I shift as required. In minus 35 weather, I end up with 3 layers above and 1 below, along with long johns, socks, and a balaclava. In the morning I reach one arm out of the bag, open the stove, stuff in birchbark and kindling, light it, close the door, set a pot of shallow ice on, and put my arm back in. Five minutes later I get up in the heat, get dressed, stick some more wood in, and go outside. By the time I get back, the water is hot for ablutions and for oatmeal. The alternative is to carry a 12 x 12 stove and keep a fire going. You don’t need so much bedding this way but every half hour or so you’re going to have to get up (or at least half up) and stoke the stove. The extra stove weight is close to the weight of an extra down bag.
The choice is yours. Either way works. If you got caught out though, sleeping under a tarp, it’d be nice to have the extra bedding.
Shocking News — I Cook In My Tent!
A question I’ve been asked is “Is it safe to cook in your tent?” Well, the stove is usually wired to 4 stakes driven in the ground, or lashed to horizontal poles, so it’s secure enough. As for bears, I use the tent in the colder seasons and in winter when they are asleep. In summer I use a Campfire tent.
To be fair, I don’t use a wall tent/wood stove rig in a summer heavy bear environment like Algonquin. Farther north, where bears get hunted, I have an idea they associate the hot metal and woodsmoke smell with getting shot at. For a bear to wander into a “base” camp is poor insurance. You’d have to leave the unit set up and unattended to encourage a bear visit. There are of course exceptions, but I’ve never encountered any.
One thing is significant: all your garbage goes into the stove and is atomized. There is no smelly trash.
Steel
The lighter the steel, the more it will warp and the less time it will last, but when you’re pulling a toboggan all you care about is weight. Steel is measured by gauge — the higher the number, the thinner the stock. A gauge of 26 is light, but will last more than a few seasons.
It’s best to use plain steel, or black stove metal. If you use galvanized, it should be OK, but sometimes the zinc coating can hide flaws in the steel. The zinc is also poisonous, so your first fire will have to be outside, and quite hot — this will melt the zinc off, and solve that problem. Galvanized steel from 24 to 30 gauge can usually be found at a heating/air conditioning business. I paid $18 recently for a 4′ x 4′ sheet of 26 gauge.
The rivets must be steel. Aluminum rivets would prove to be a disappointment!
For stovepipe you’ll have to search out 3″ galvanized eaves trough downspouting. This is gradually being replaced by plastic. I found mine at Robinson’s Hardware in Barrie, Ontario, and it came in 10 ft lengths.
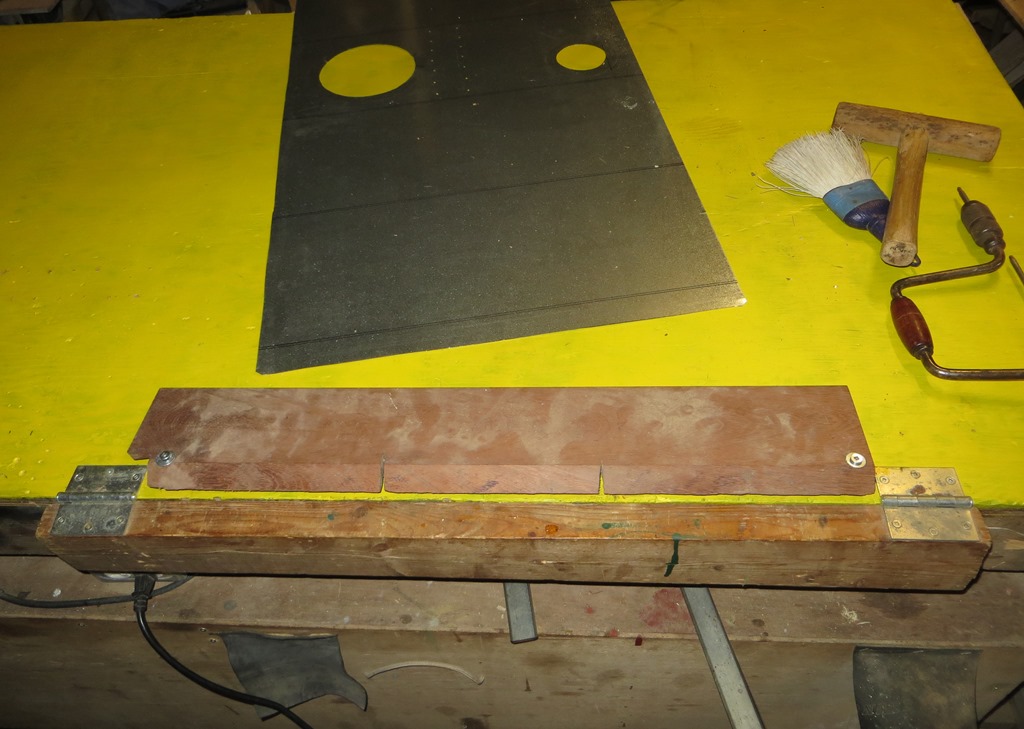
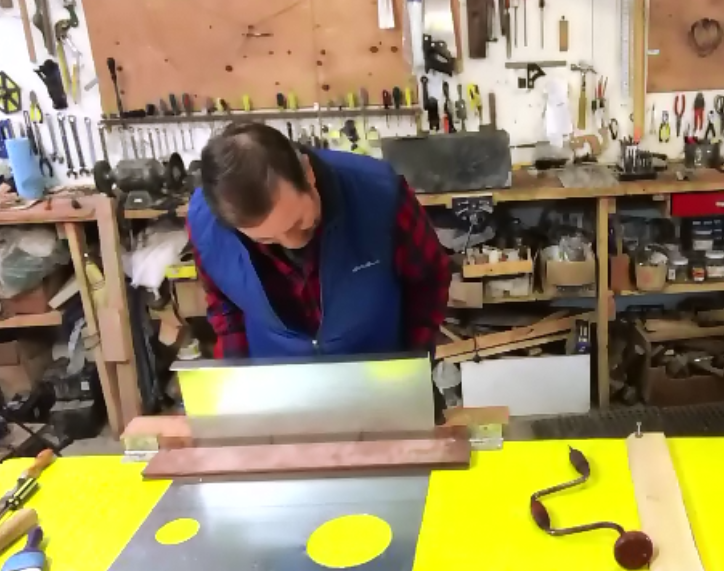
Bending Break
Make a bending break by hinging a 35″ 2 x 4 to a workbench as in the photo. Use reasonably strong (3″ x 3″) hinges. The sheet metal to be bent up is held down by a hardwood 1″ x 6″ x 28″, with its front edge bevelled at 45 degrees. (This bevel allows you to bend past 90, allowing the piece to spring back to 90 degrees.) This top plate is held down by stout screws at the ends, or lag bolts, into the work bench, but if the screws by themselves don’t exert enough downward pressure, you need a center press. Fasten a 6″ block to the middle of a 4′ 2″ x 4″. This is placed on the top plate, block side down, and the ends are clamped to the workbench with large C clamps. All the C-clamp pressure is exerted by the block, onto the center of the top plate. Each bend thus requires a bit of a set up, but this is not a production shop.
[click to enlarge]
But for small bends, it’s actually easier to use a vise, and/or sheet-metal pliers. Or clamp the piece to your workbench with the tab sticking over the edge, then bend it down by tapping along the edge with a hammer.
Materials
4′ x 4′ of 22, 24 or 26 gauge steel
100 1/8″ “Short” and 100 “Medium” steel pop rivets (NOT aluminum) Buy a reputable brand. 20 “Long” rivets for stove-lid and draft control
10′ x 3″ galvanized down-spouting
2 3″x3″ hinges for break
3″ adjustable–angle galvanized elbow
scrap 2 x 4 for break
a piece of 1×6 hardwood for the top plate
a 2 x 6 to clamp onto the workbench horizontally so that the stove can be slid over it like a sock, when rivetting
12 #6 x 1/2″ wood screws for holding pieces for hole-drilling
#10 x 1 1/4″ SS bolt for draft-plate pivot, 2 nuts, a spring to fit snugly on the bolt-shaft.
Tools
fine gloves, eye-protection, ear protection, pliers, sheet-metal vise grips, assorted clamps, hacksaw, electric drill, 1/8″ bit, rivet-gun, tinsnips, straight edge, sharpie marker, ruler, jigsaw with metal cutting blades (2), small grinding wheel for the electric drill to grind off rivets placed in error, screwdrivers, dumbells to weight sheet-metal when cutting, hammers, compass, file, round-file, punch for marking drill-holes, countersink for removing burrs from drilled holes, (belt sander for removing burrs), (step-drill-bit, for larger holes in sheet metal)
Construction
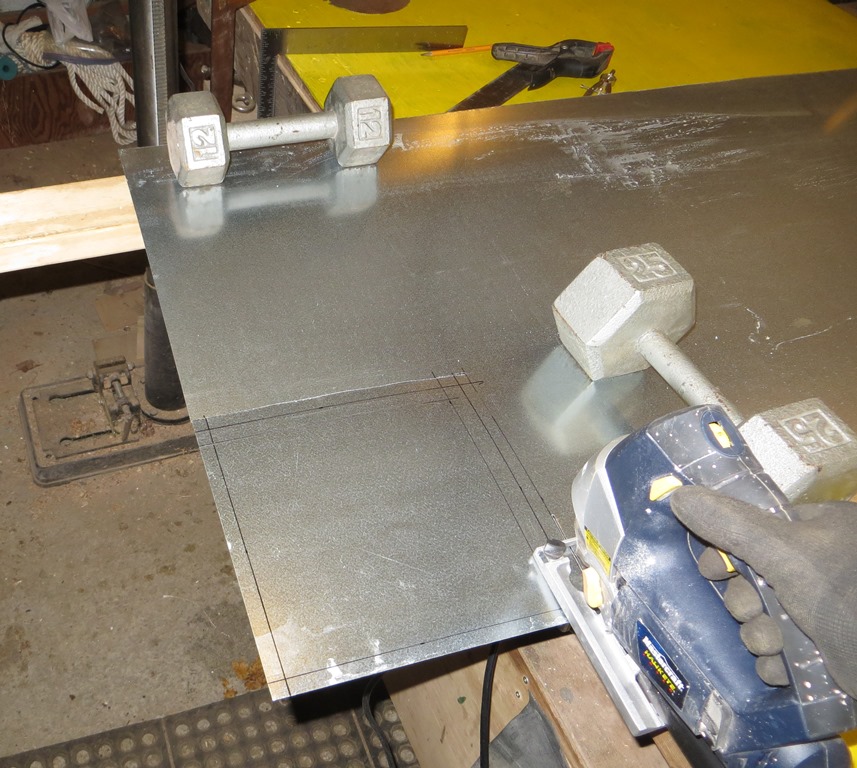
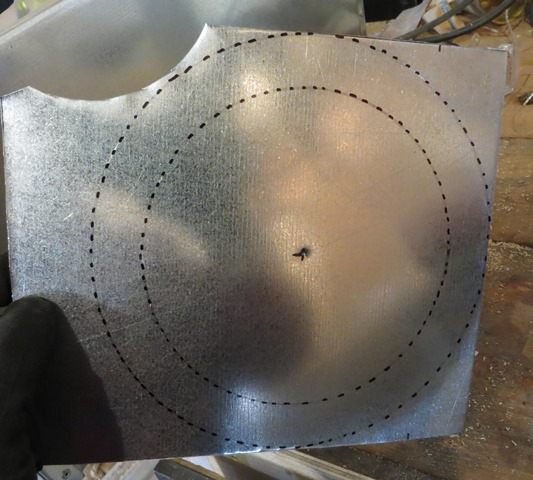
1 Mark out the sheet metal for cutting and bending as per the diagram. Allow 1/8″ for the bends. Cut it from the 4′ x 4′ sheet. (Using a metal-cutting blade in a jigsaw is simplest. The slot in a Workmate is useful for the cutting-path, plus improvising a support surface for the rest of the sheet.) File or belt-sand the edges smooth.
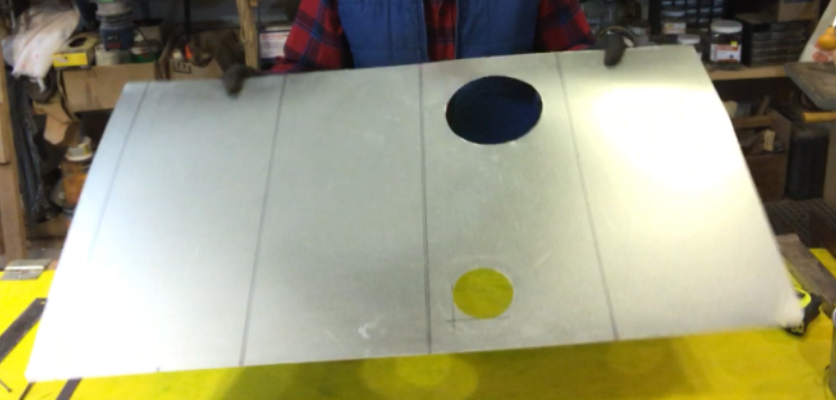
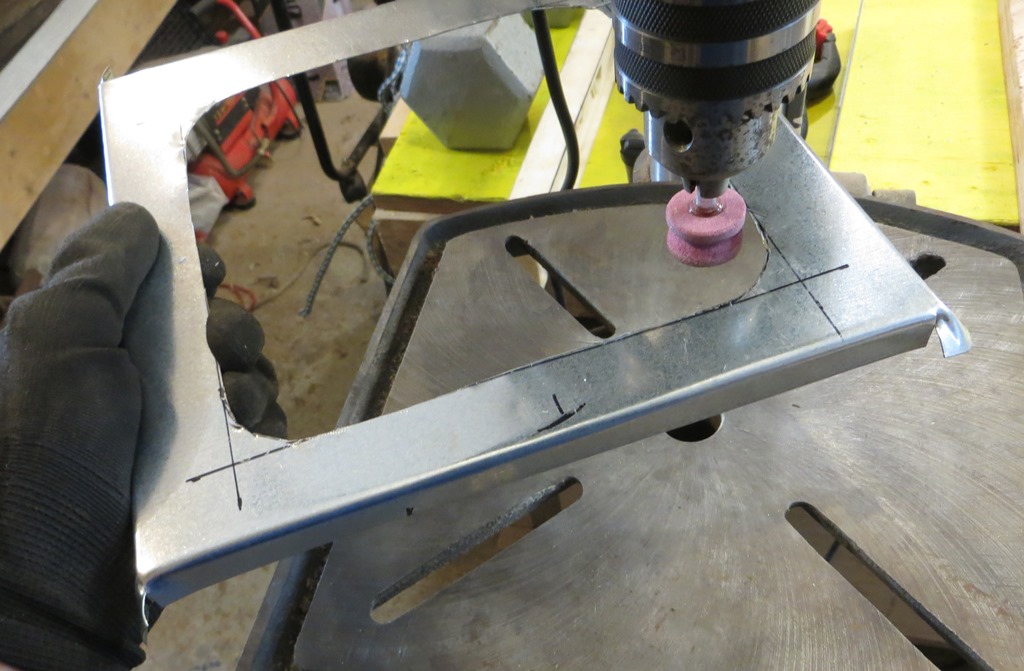
2 It is easiest to cut the stove-ring, the stovepipe hole, and also pre-drill for the under-top stiffener and the stovepipe socket, BEFORE bending-up the sides of the stove. Layout the stove-ring to be 1/8″ bigger than your middle-size pot. Cut by drilling a small hole just inside the circle, then a larger hole, then start and proceed carefully with tinsnips or jig-saw (jigsaw is easier). If you’re careful, this piece can be used later for the draft-plate.
3 The stovepipe hole should be 1 3/4″ from the back, and 1 1/4″ from the side. Plan out which side (depending on how you will orient the stove in your tent, and where the pipe will run). Remember you are looking at the underside of the stovetop — thus it’s reversed. Layout and cut and file smooth.
4 A stiffener under the stovetop greatly reduces warping. It need not protrude more than 5/8″ into the firebox. Cut and bend it, lay it out and pre-drill now before bending, but don’t final-fasten it yet. Put a piece of plywood underneath all, and use temporary small screws to hold it in place while you drill the dozen or so holes. Mark which side goes where.

5 Remove the stiffener, and begin the same process with the stovepipe socket. Cut 2 1/2″ off a piece of stove pipe stock. (Start the cut with a hacksaw, then continue with the jigsaw.) It’s hard to clamp stovepipe. One way to stiffen it in a vise is to insert a round object almost as big as the pipe (in this case, a paint can just outside the cut).

6 Mark it all around 3/4″ from the end, make 3/4″ cuts up to that line, and bend each of these tabs outwards 90 degrees with pliers, forming a skirt.
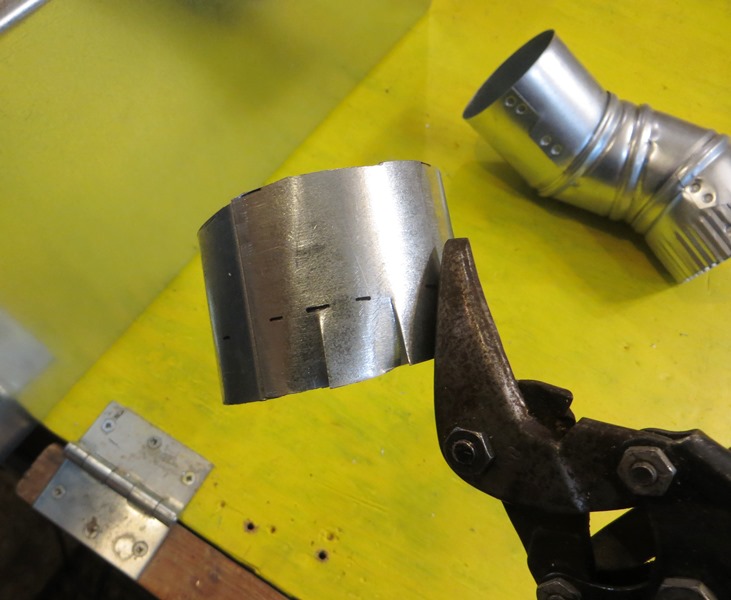

7 Center-punch and drill every other tab or more.
8 Slide the end of the sheet of stove-metal off the workbench, then insert the stovepipe socket in the hole. (It ends up going from inside to outside.) Mark the drilled holes, plus an orientation mark. Remove, and then slide the sheet of metal back on the bench, center-punch, and drill the rivet holes for later. (It’s much easier to accomplish this step now!)
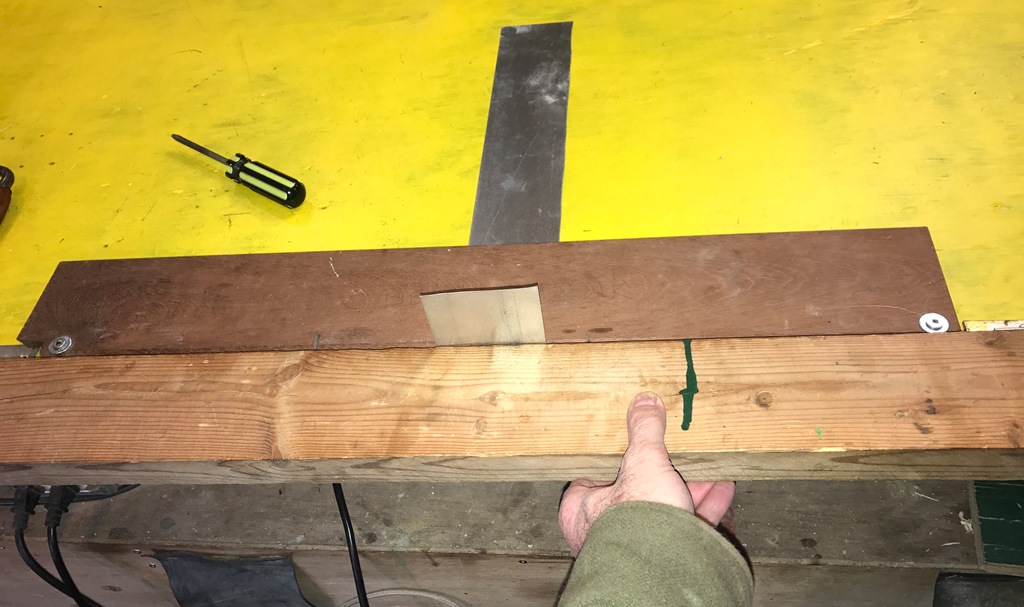
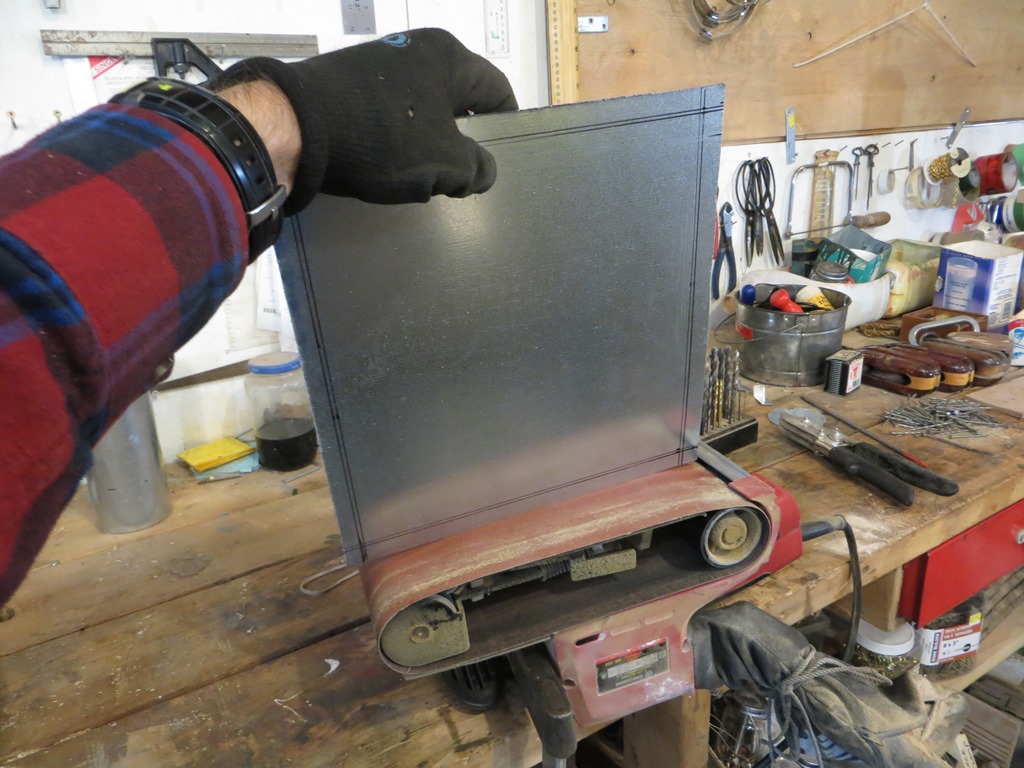
9 Use the bending-break and bend up the sides of the stove. Start with the tab.
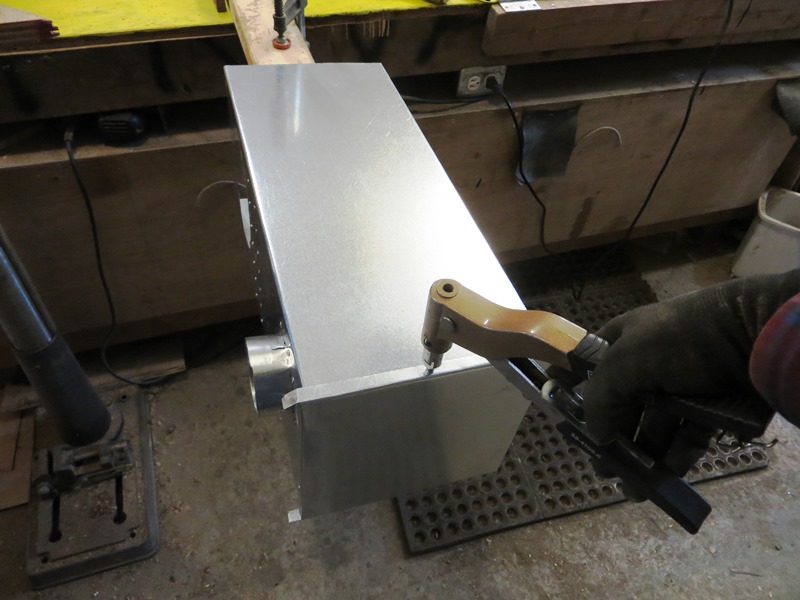
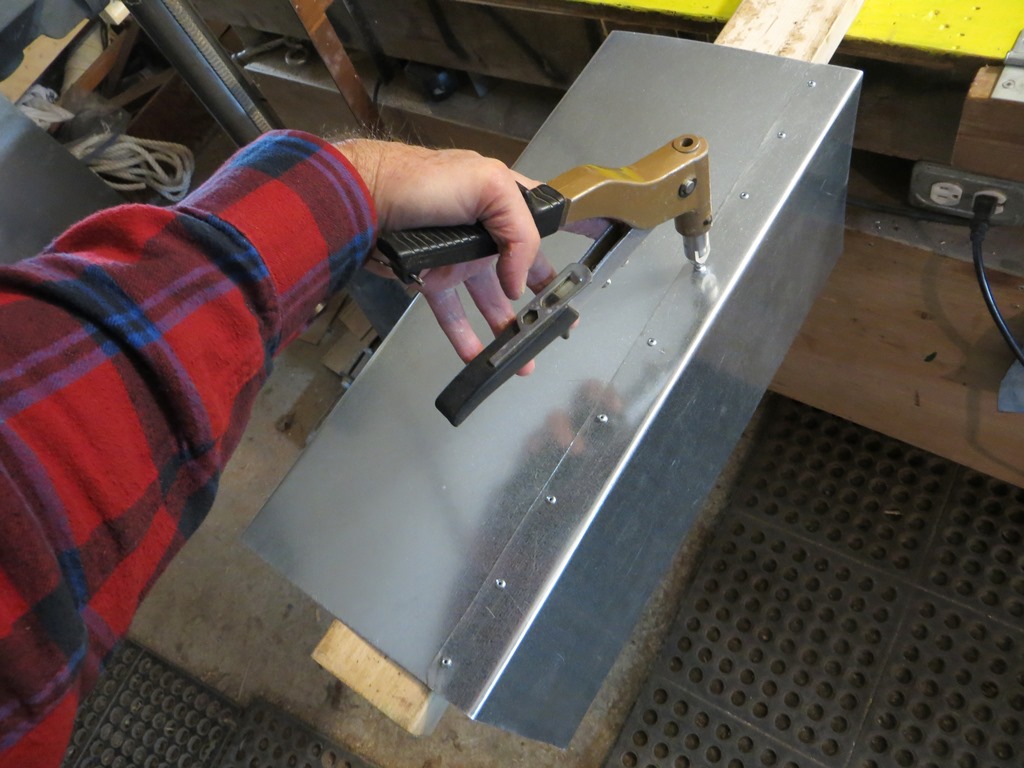
10 Clamp a 2 x 6 to your workbench, then slip the stove over it like a sock. Then drill and rivet. Note: it’s easiest to first drill the hole at each end and put a temporary screw through into the wood, then drill all the rest of the holes. This allows the metal to sit flat on the wood without rivet-tails in the way. Also, don’t drill the end holes too close to the end — leave room for the flange of the back-piece and front, and their rivets.
11 Rivet the stiffener into place.
12 Rivet the stovepipe socket into place.
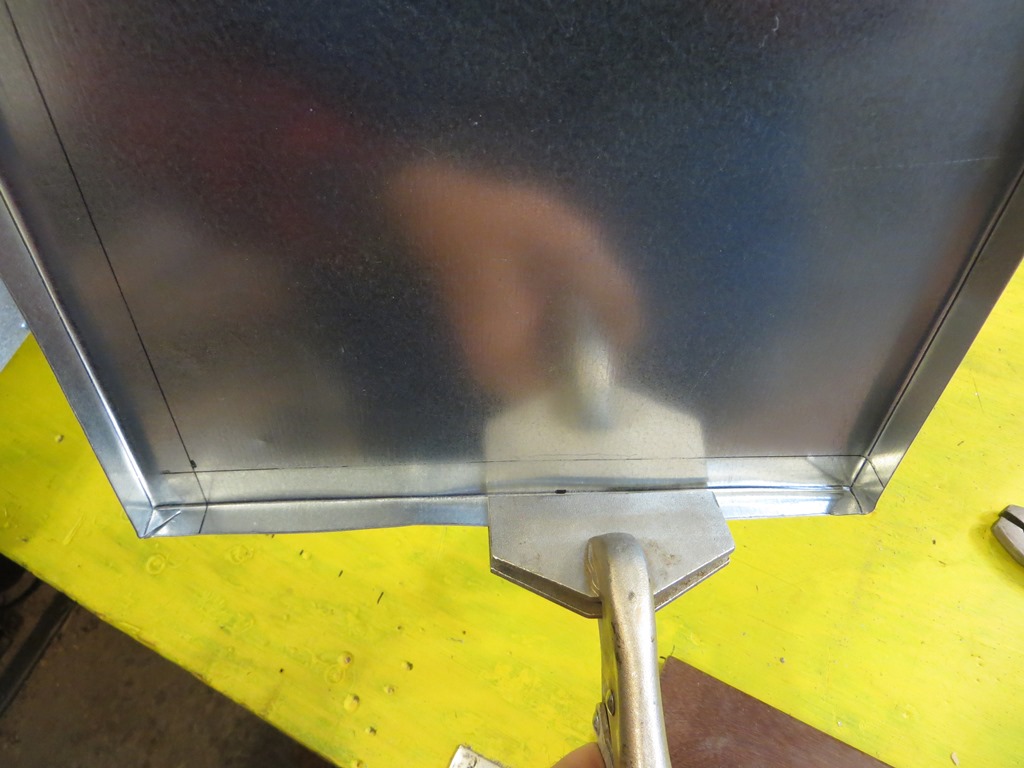
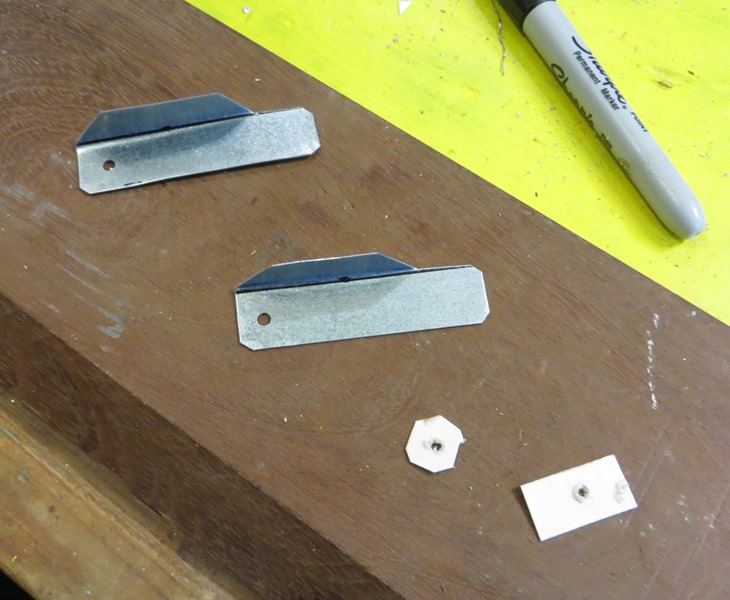
13 For the back, carefully measure the opening, then cut a piece 1″ larger both ways. It’s helpful when cutting sheet metal to hold it down with clamps or weights. And a belt-sander clamped to the bench is an easy way to remove burrs (don’t hold it like in the picture!).
14 Mark 1/2″ in from each edge, and bend a 1/2″ tab up along each edge. You’ll find of course that the tabs interfere with each other. One way to deal with this is to cut the corners at 45 degrees, then make a cut about 3/4″ deep in the front edge of the bending-break’s top plate about 10″ from one end. As you bend, the previously bent tabs go into the 3/4″ deep cut on one side, and just off the edge of the board on the other.

But don’t get too worked-up about the neatness of this. Even if you use the sheet-metal vise-grips, and work the bend up a bit at a time, it’ll work out fine.
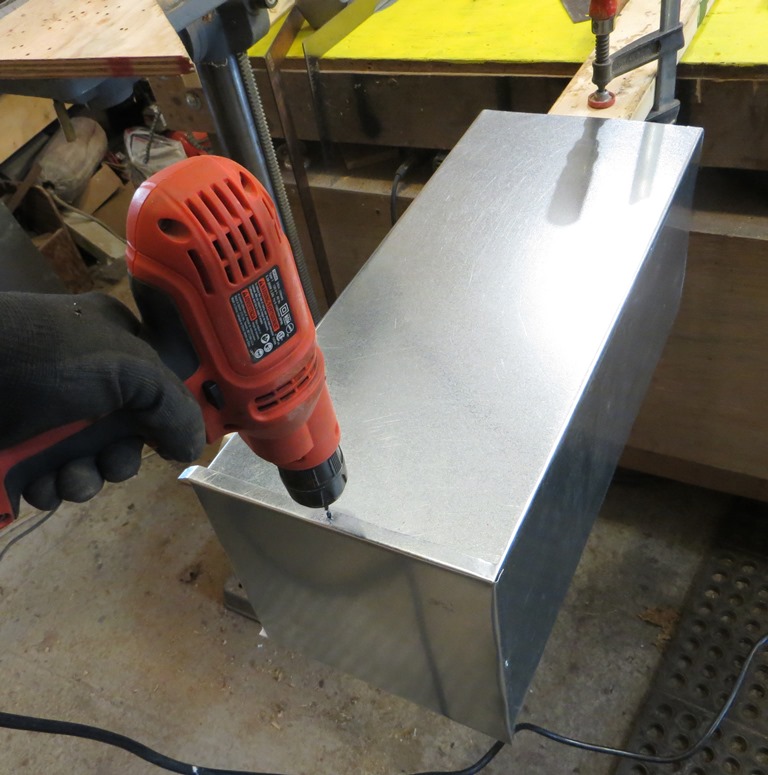
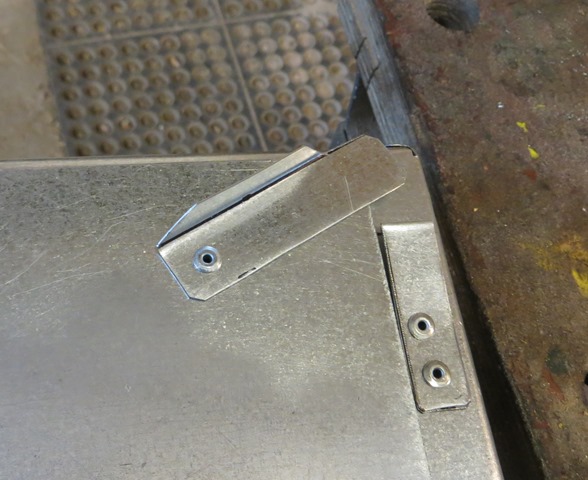
15 Drill and rivet the end-piece into place. It’s helpful to pre-drill the holes in the end-piece first (see lower photo of front-piece).

16 Make the front end-piece the same way, but cut out the center first. Make a deeper lower lip to help prevent coals from spilling out, at 1 1/2″. On the side leave 1 1/4″ to allow room for the hinges, and the latches. The top can be 1″. Use a file or stone to smooth the inside cut.
17 It’s helpful to pre-drill the holes. And when you drill into the stove body, a piece of wood cut the right length lets you push without distorting the surface.


Then rivet it into place as per the back-piece.
18 Make the door on the workbench, not the stove. Decide which way you want it to open so that you can stoke it while still inside your sleeping bag. Keep in mind where the door will fit on the front-piece and be careful to make sure the hinge rivet tails won’t conflict with the edge of the door, or it won’t close. The latch side needs clearance to allow room for the latches — say 5/8″ — and the hinge side about an inch. The top and bottom can be within 1/4″ of the front-piece. (Note: these dimensions are approximate. Your stove may be slightly different. Just make sure there is room for the hinges and the latches. If in doubt, mock it up with apiece of paper.) Mark it as Front.
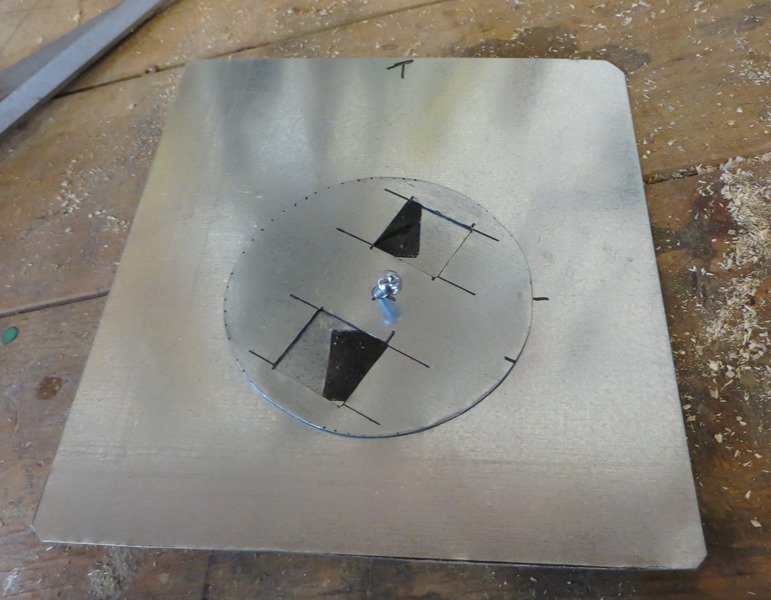
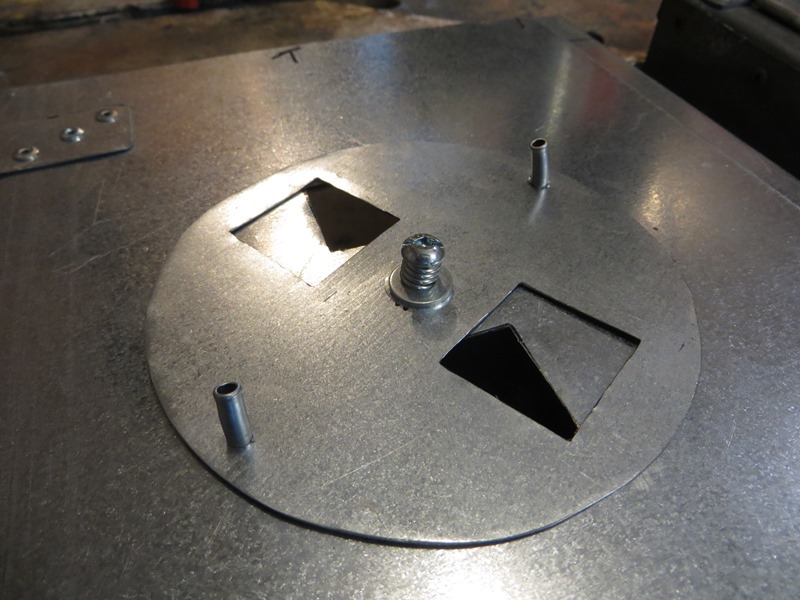
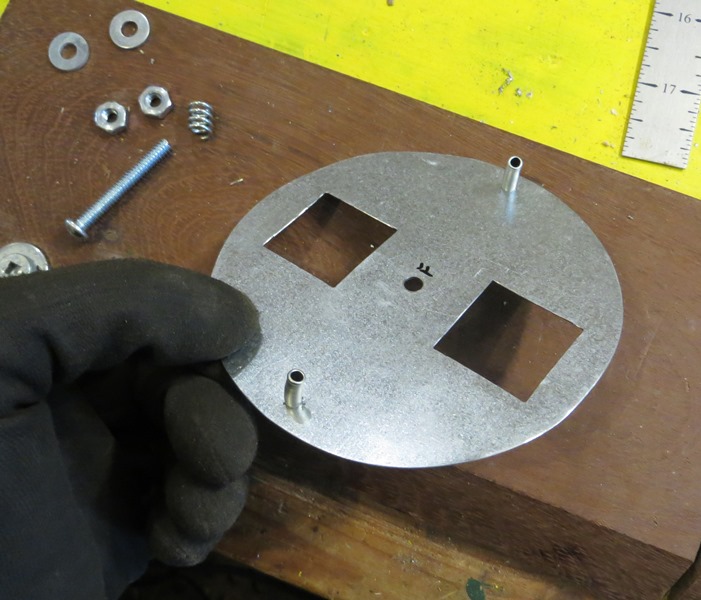
19 Mark a 4 1/4″ disc for the draft-plate, using a compass. (Don’t cut it yet — it’s easier to cut the air holes while the piece of metal is large enough to clamp.) Mark the 2 air-holes as per the photo, 1″ square. Use a small drill bit (1/8″ is fine, and drill the corners. Then drill a larger hole(s) to remove the material. (Note: a step-bit is a good way to drill large holes in sheet metal.) Then file square, to the lines. Then drill the center hold for the pivot-bolt. Finally, cut out the disc.

19 Lay it on the door, and the door on the stove front, and figure where the draft should be. (Keep it low, but above the lower lip of the front-piece. Transfer the draft holes and the bolt hole to the door. Then cut out the draft holes on the door to match the ones on the draft-plate, and the bolt-hole.
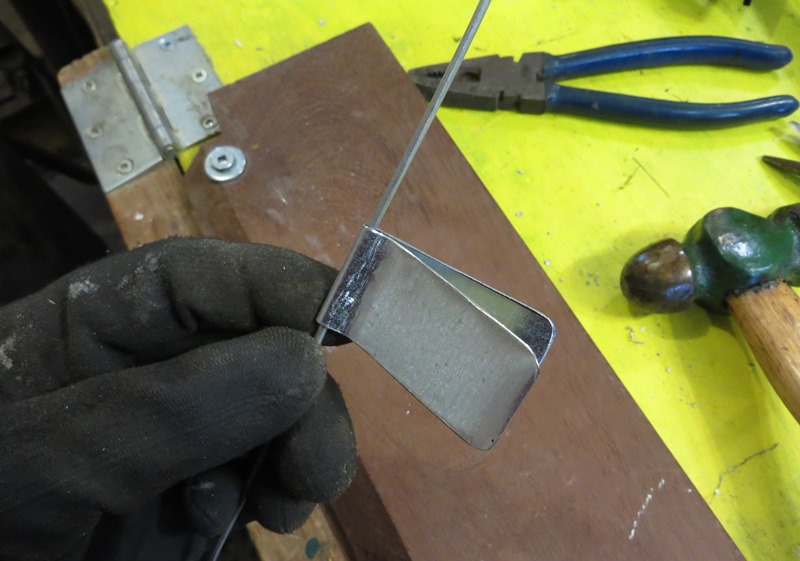
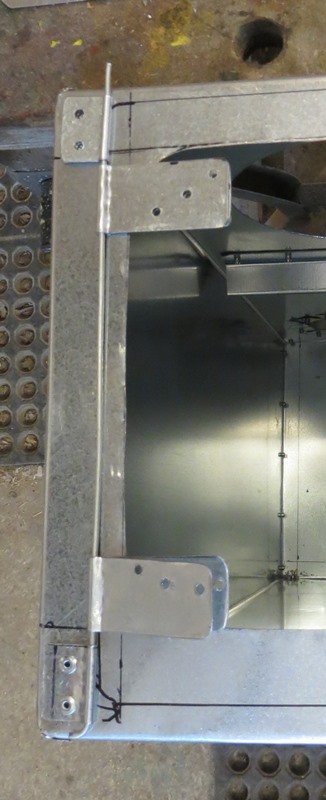
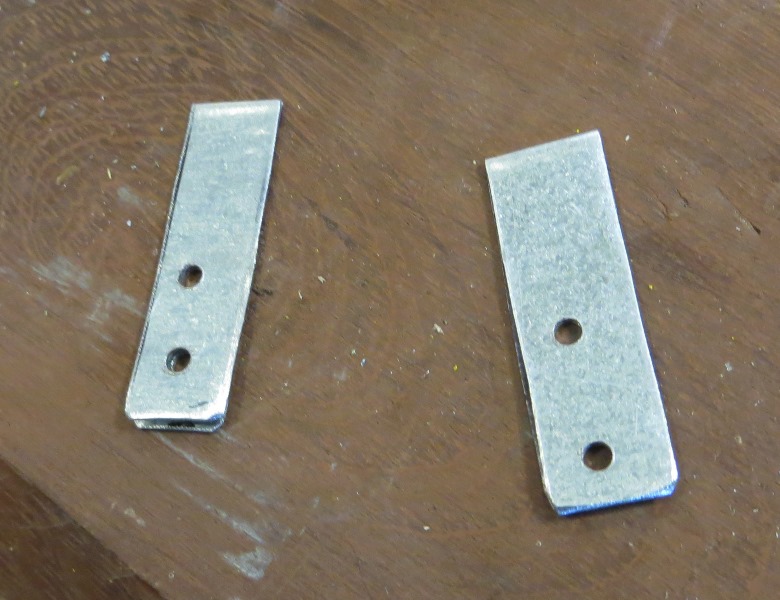
20 I used tabs bent around a stiff wire for a hinge. (You can squeeze them in a vise, or tap with a hammer on a flat surface.) Once again plan out the rivet tails so they don’t conflict with the front-piece. Also ensure that the lower hinge on the door is snug against the hinge rivetted to the stove, or else the door will slide down when opened, and then won’t close. Rivet the bottom hinge onto the front-piece, but don’t rivet the top hinge onto the front-piece until all measurement and marking is complete, otherwise you can’t just slip things off and on as you fit them. (Note: these simple hinges work better than store-bought because they can be trimmed to fit the exact space.) Mark and pre-drill the door hinges. When all is in place and it fits, rivet the hinges into place.
21 The draft plate needs 2 rivet-tails sticking out the front; these are to adjust the draft when the thing is hot. Use long-tailed rivets. Then drill the hole for the draft-plate, and install. The spring holds the plate against the door to reduce air leakage. On the inside, use a lock-nut, or peen over the end of the bolt so it won’t come unscrewed. Don’t use nylox — it’ll melt.

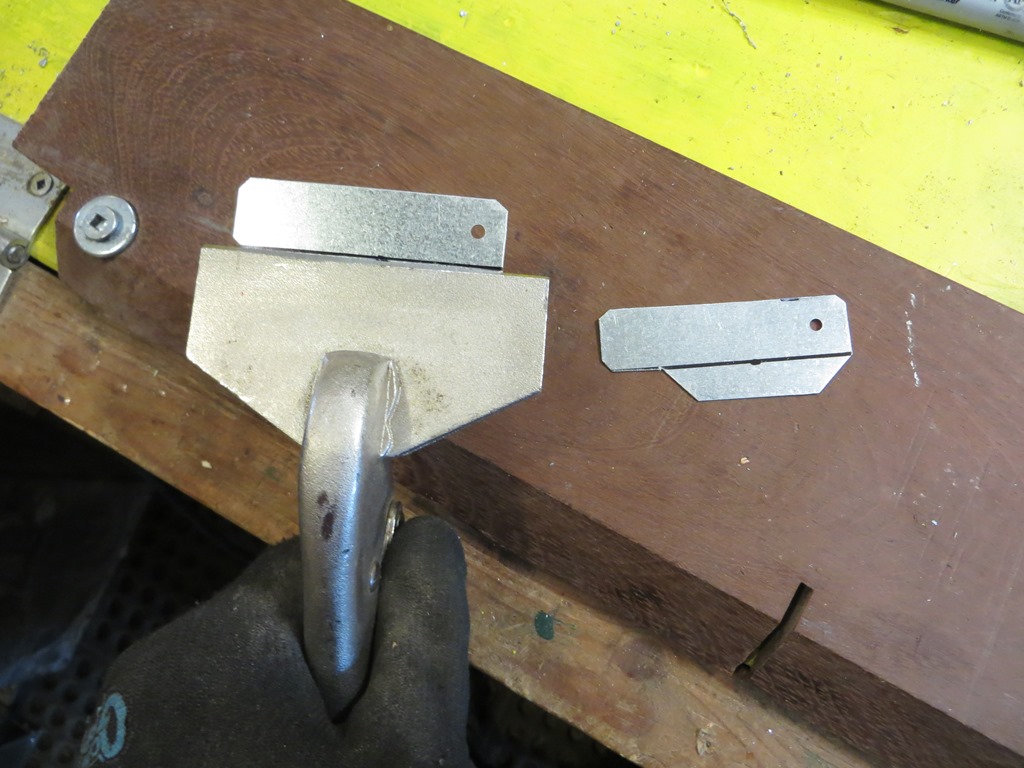
22 The latches are very simple — just strips of metal. Install the ones on the front-piece first. Make them out of folded-over 26 gauge so they will be stiff. I wanted a finished size of 1 3/4″ x 1/2″, so started with 3 1/2″ x 1/2″.

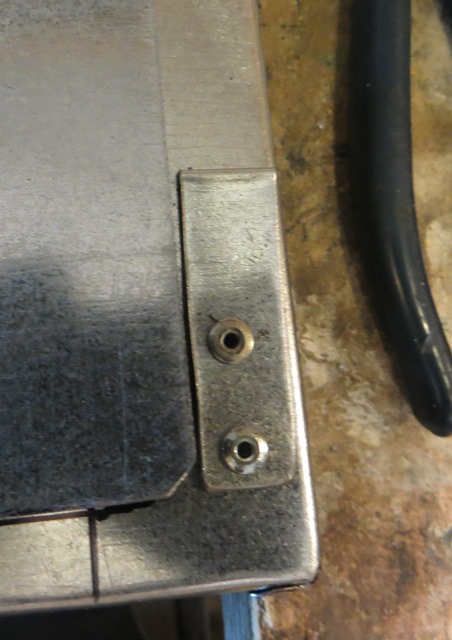
23 The swivel-latches on the door are left until now to get the best alignment. They are simple pieces of metal, with a tab bent outwards at 90 degrees to stiffen them. When you rivet them into place, use a paper washer underneath. This will burn away and leave enough space to prevent binding.
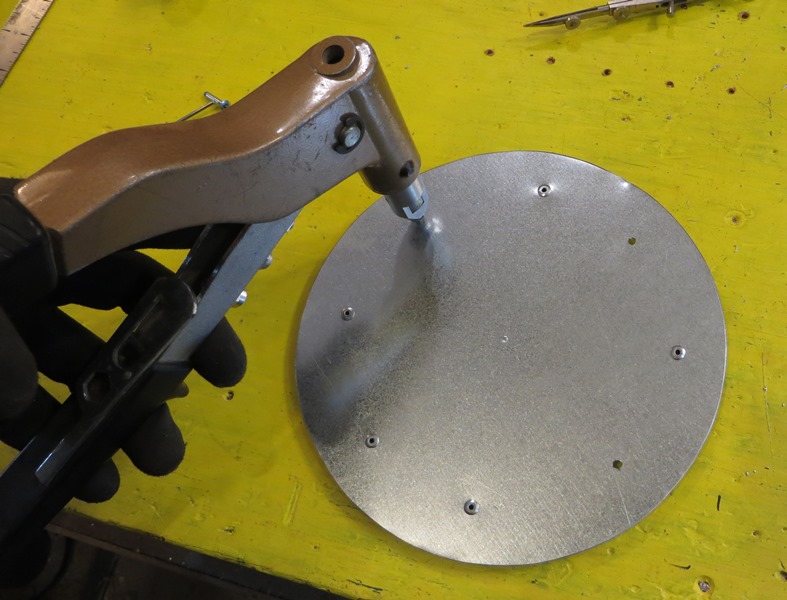
24 Looks like a stove now, doesn’t it! The only thing left is a stove lid. Cut a circle of metal 2″ bigger than your hole. Set it centered over the hole. Reach in from underneath and trace the hole on the lid with the sharpie. Then drill and insert long-tail rivets inside the inner circle. (These stop the lid from shifting around. Also, if the lid is placed on the flat surface of the stove, it serves as a spacer for a pot, so the rice won’t burn.)
25 That’s it! You have a woodstove! However, if it’s made of galvanized, it’s poisonous at this stage. For the first fire, set it up on some bricks in your yard and fire it up. Stick a couple of sections of stovepipe on. Get the fire good and hot until you see the zinc melt and drip off. If some remains, don’t worry about it. All that was going to vaporize, will have done so. Well done!