|
Practical
Bush Gear: The Modern Tobaggan |
|||||||||||||||||||||||||
|
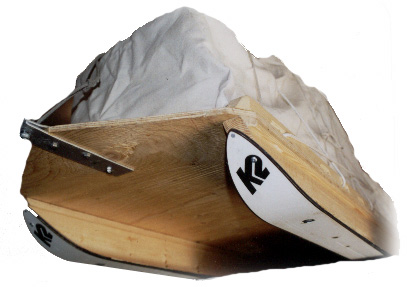
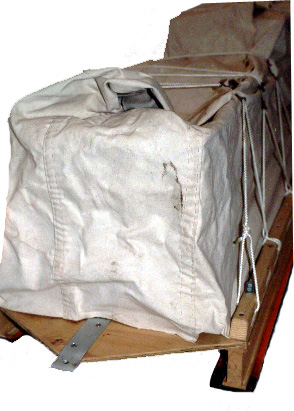
It would be very nice if you could condense a wall-tent wood-stove camping rig into something that would fit in a 30lb backpack, but you can’t. It’s just too bulky. That’s too bad, because the practicality of this way of bush living is so obvious once you’ve tried it, that going back to an unheated pup tent in winter is repulsive. You want to bring it, and that means you’ve got to haul it. I’ve tried many methods of hauling, from the long skinny traditional toboggans, to plastic pulks, to rolls of polyethylene, but the simplest, cheapest and easiest-pulling rig I’ve come across is based on using 2 old-fashioned downhill skis. Think about it. A set of skis has to support a 180lb person in soft and hard snow, it has to last for years, and it has to slide very easily on all types of snow. If it doesn’t, it just won’t sell. There’s a kind of natural selection here. Slow skis don’t cut it. Obviously no one is going to sacrifice their state-of-the-art $600 Ski Magazine wonders to make a toboggan, but yard sales and pawn shops and goodwill stores are plentifully supplied with perfectly acceptable 70s and 80s vintage downhill skis for as little as $5. You can probably find a set in your parent’s garage for nothing. The concept after that is simple: 2 risers, a flat deck between them, and some way of lashing down or containing your load. The materials are cheap. Besides the skis, construction-grade 3/8” spruce is fine for the deck, and 2x4s are fine for the risers. (Don’t use thicker plywood. The deck must allow the runners to twist and flex, and thick plywood would prevent that.) Simple carriage bolts or threaded rod hold it all together (hot-dipped galvanized or even stainless steel if you want to avoid rust), and you can pull it with either a solid tongue or a rope to your harness. Use simple canvas for a “tank” (a containment), or just lash the load on. The only problem is volume. Skis aren’t very long. If you can find a set of 210cm skis you can make the unit long enough to contain a 1 week/2-person camp (if you’re ruthless about what you leave behind – always a good thing), but if the skis are shorter or the gear more bulky, 2 sleds are required. This need not be a problem. Check out the photo. It’s easy to hitch 2 smaller sleds together with a simple, bombproof hitch, so that the rear sled rides in the tracks of the first. This combination allows you more flexibility. Sometimes you may not want the great big double sled – then you just take one. Also on a route containing many steep uphill grades, it may be a blessing to be able to divide your load in 2. Two sleds will go over small hills and humpty-dumps more easily than will 1 rigid one. And you might want to use one small sled for day trips or gathering firewood or hauling home the huge quantities of fish you’re going to catch (!). (By the way, there’s a trick for climbing steep grades. Take along a 100ft 3/16 line, which is light and useful to have, and a sturdy pulley. Fasten the pulley to a tree, or to a line between 2 trees at the top of the hill, and thread the 100ft towline through it. Then hitch a person to the free end. As they come down the hill, they greatly ease the load of towing the unit up the hill! The long line is also useful in belaying the load going down steep hills.) One risk I’d like to point out is that children will want to use this rig for a play-toboggan. It works well of course (too well), but it’s lethal. If it hit a toddler going at speed – and it goes at a very high speed – it would surely cause an injury. Please don’t allow it to happen. This is not a toy. |
|||||||||||||||||||||||||
|
||||||||||||||||||||||||||


Materials/Construction |
||
|
||
 |
Again,
use 3/8” 3-ply plywood for the decks – no thicker. It
is strong enough and allows the unit to flex. Orient the grain of
the 2 surface layers across the toboggan. Otherwise it’ll splay
out. This means a joint (since the ply comes only 4ft wide), but that
doesn’t matter – the 2x4s hold it all together. The ply
is held in place by the bolts, and also by screws holding down the
gunwale. Don’t cut the ends of the deck off square. Cut them
into a shallow point, so that you can hitch 2 sleds together and still
turn a corner. Make a strong towing hitch by wrapping a piece of 14”
x 1 _” x 1/8” aluminium strap around the point, having
it stick out 1 _” or so (see photo). Bolt right through, put
on the nut, hacksaw the excess bolt off almost flush, and peen the
end over with a hammer so that it’ll never work loose. Put a
small clevis, or shackle, through a hole drilled 3/8” back from
each end, to tie to. If joining 2 sleds, use a piece of cord between
the shackles, tied in a loop. This will act like a shear-pin and will
break before the rear sled lodges against something and gets damaged. Update: Suggested Modification While using this sled on a trip last winter, I discovered a weakness. The sled had just run down a little slope and buried its nose in a snowdrift. This was no problem, but unknown to me one of the skis had wedged itself in the branches of a low bush, and when I gave a mighty heave to lift the sled clear I broke the front of the sled clean off. It fractured straight across at the point where the deck projects forward beyond the skis. Don’t forget that the grain of the plywood runs across the sled, and that it’s 3-ply. That means there is only 1 ply running fore and aft, and that just doesn’t supply enough strength. Also the metal strap happened to end just at that point. I still recommend using the projecting front. To make it strong enough I advise doubling the plywood to a point about 6 inches aft of the front of the skis. Once this is glued and screwed into place flex will be reduced and there will be ample strength. There is no need to fit this extra piece into the riser or the outwale. Simply attaching a plywood plate under the deck, fitting between the risers, will suffice. Remember to allow for 2 thicknesses of plywood (3/4”) plus the metal strap for the strap bolts (now 1 _” x 3/16 stove bolts). Having made this repair I used 2 of these sleds on another snowshoe trip (10 days) in deep snow NW of Sudbury, and they stood up to the journey just fine. |
|
A canvas surround, or tank, is a great idea. It adds weight initially, but it prevents snow from being crammed into every nook and cranny of your lashed-down load, and thus ends up saving weight. It also prevents things getting lost. Access to your load is made much easier too, since a simple out-and-back pattern of lines into hooks will hold the canvas in place. You can retrieve or stow items securely in a flash. (This is important. Losing a heavy mitten or a snowshoe or a rolled-up parka is no joke.) The fabric should be stiff. Use 10oz or so, and treat it with paint-on waterproofing. Make it quite tall, so that it overlaps a double-stacked load. Cutting a 60” wide bolt of cloth in half lengthways is about right. Arrange the cut edge to go under the gunwales, and the selvage edge uppermost. You’ll have to sew the ends together, probably by hand. I used the seam type that mimics what you see when you hook your hands together, with 2 lines of stitches. To create that, I folded 5/8” of the fabric back, ironed it hard to get it to stay folded, hooked the other similar fold into it, pinned it, and sewed away with waxed linen thread. (see photo) Tedious to do, but strong. The gunwales can be spruce. I cut scuppers into them to save weight and allow a place to tie to. I did it on the table saw, but it can be done with a router, or saw-and-chisel. They should be held down with screws as well as the bolts, otherwise they may split under the pull of the tie-down lines. (Drill and countersink. I used #8x 2 _” deck screws about every 10”.) This also holds the canvas down since it is trapped underneath. Round the edges of the scuppers so that the cord won’t get cut. Remember to arrange the canvas under the gunwale so that it emerges to the inside, otherwise your tie-points would be covered up. |
 |
|
Use a hook-and-loop tie down system. (Don’t use bungee-cord
– it performs poorly at cold temperatures and just plain doesn’t
work as well.) This is fast and easy and secure – especially
when your fingers are half-frozen. Make the double-ended hooks from
1/4” copper brake tubing: cut a 4” length and lay it on
a flat metal surface. Flatten it gently with a hammer. Pass the ends
down a file to remove any burrs. Bend them around to the required
shape (see photo). I did this by clamping 1/4" bolts in a vise
about 3/16” apart, sticking the piece of copper in between,
and bending it around. If the bolts spread, spin a nut on one, and
hold them together by drilling 2 holes in a small piece of scrap metal
and slip it over the ends. You may have to cut part of the bolt-heads
off to get them to lie close enough together. On one side of the sled, tie a 3/16” cord to the end scupper, and then thread it through the scuppers so that there’s a loop about every 14”. Each loop should be clove-hitched to the scupper. (This is so when you pull on one loop, all the line doesn’t get pulled through from the other loops.) Set a hook into every loop at its mid-point and crimp it so that it stays put. Arrange the hook so that its opening is upwards. On the other side, tie a 3/16” cord to the end scupper and again loop it through the scuppers to match up with the hooks on the first side. This is what you cinch down on to secure the load. By starting at one end, hooking it in, and tightening as you go, it’s easy to make all snug. You need a very long line – start with 50ft. Leave lots extra at the end to allow for large loads. Before assembly, seal the wood with paint or varnish, thinned a bit to penetrate. This is to prevent the wood from soaking up moisture and getting heavier. |
 |