|
Practical
Bush Gear:
The Super Spool
|
| |
Fishing
rods are a nuisance in a canoe. They're always getting snagged
on tree branches, stepped on, left behind; they hook packs and
bodily extremities more often than fish, they occupy valuable
hand space on portages, and your novice bow--paddler learning
how to cast with one is a positive menace.
And yet fresh--caught trout or pickerel is one of a back--country
trip's supreme pleasures, and a fish catching device (other
than the C.I.L. variety) is an essential piece of emergency
gear.
|
 |
|
While
on a vacation trip to Australia many years ago, I came across
a novel hand--spool. What was unique about it was the bevel
on the far rim. This, as was demonstrated to me, allowed casting.
I was very impressed to see the angler unwind his lure on about
3 feet of line, whirl it around a couple of times, release,
and achieve a casting distance of about 30 yards. He faced the
spool in the direction he wanted to cast, and the flung lure
pulled the line out just as it would from a reel. Then he turned
the spool 90 degrees and wound it back up. If a fish struck,
he could even play it, pinching the line with his fingers as
it rolled off the bevel again. |
| |
A
great device, it was small, light, cheap, nearly unbreakable,
and I bought 3. (Unfortunately it was also patented.)
I've never seen them marketed in North America, however while
passing through a plumbing aisle at a Home Depot the other day,
I saw a PVC pipe adaptor with a bevelled face, so I bought it
and a few other small items and assembled a hand spool of my
own.
|
|
|
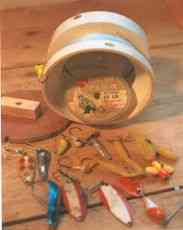
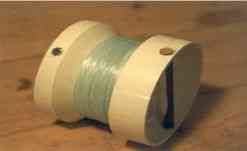
The
one depicted here is better than the original. It has a better
grip, and has a tackle compartment large enough to hold all
the lures an honest man is likely to need. (Bob Izumi wouldn't
be impressed, but in actual fact pike and pickerel are not over--particular.
A few spoons and mr. twister jigs are usually enough.) The tackle
compartment will also keep the unit afloat long enough to fish
it out--probably.
It's a great unit. It's a rod and tackle box all in one, it
fits easily into a pack, it's cheap, and you'll never break
the tip off of it. |
|
Materials
1 - 3" to 4" PVC sewer pipe adaptor (mine was white)
1 - 4" end cap
1 - tube of "Plumber's Goop" adhesive, the variety
suitable for PVC (not the standard PVC pipe connector solvent.
The "Goop" is a bit like silicone sealant and works
better.)
1 - 6" of 3/8" dowel
1 - small piece (8" x 8") of 1/4" plywood or doorskin
2 - brass #8 x 1 1/2 screws
1 - sheet 220 grit sandpaper
1 small acid brush for the glue
Tools
hacksaw, fretsaw, countersink, electric drill, 3/8"
drill bit, 1/16" drill bit, chisel
|
| |
Method |
1
Using a sharp chisel, pare off the raised numbers found on
the bevelled surface of the adaptor, so they won't snag your line
as you cast. If the edge of the bevel is rough, smooth it out with
fine sandpaper.
2 Center the small end of the adaptor on the flat face of
the end cap, so that the opening of the end cap is away from the
adaptor. Trace the outer circumference of the adaptor on the end
cap. Now cut the marked circle out of the end cap, carefully, so
that the adaptor piece fits snugly inside the hole. (Start the cut
by drilling a hole, and then use a jig saw. If you're using a fret
saw, take the saw apart and reassemble with the blade in the hole.)
3 Place the large end of the adaptor on the plywood,
and trace the inside circumference. This will become the tackle
compartment lid. Then place the small end on the plywood and trace
the outer circumference. This will become the tackle bottom. Cut
out both pieces.
|
 |
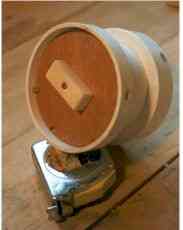
4
Glue the adaptor into the end piece, letting it intrude about
1)8" into the end cap compartment. Sand the glue surfaces lightly
first. "Plumber's Goop" allows you about 30 seconds for
adjustment. While the glue is still wet, glue the smaller plywood
disc on as well (tackle box bottom).
5 Figure out how much space you need for your fingers
( 3)4" ?), then drill a hole through both sides of the end
piece for the dowel. You might want to allow room for wearing gloves.
Then cut the dowel to the right length, and glue it in place. I
made mine too close the first time, so I took it out and pared about
a third of the diameter of the dowel away, and sanded it smooth. |
| |
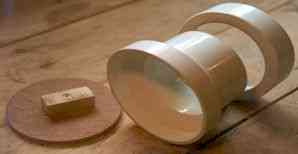
6
Attach a handle of some sort to the other plywood
disc you've cut out, and make sure this lid fits into the bevelled
piece. It should be snug, without binding. To keep it there, cut
2 #8 brass screws long enough so that after they've been countersunk
into the PVC, the shanks will protrude inside about 1)8". Then,
with the lid in place, measure in from the edge. Transfer this measurement
to the outside, allow for the thickness of the screw, and drill
and countersink a hole on each side. The heads must not protrude
or the line will get snagged, and the shanks should be just clear
of the wood inside. Dry--fit the screws, and mark their location
on the plywood. Then remove the plywood, and cut the slots for the
screws. Make sure everything fits, and then glue the screws into
place. (Rough up the undersides of the screw heads first, so the
glue will get a grip on the brass.) The lid works by pushing the
slots past the screw shanks, then turning the lid so the slots and
screws no longer line up. |
| |
7
Drill two 1/16" holes through the back flange of the
reel. This will give a secure place to fasten the line.
8 It may be that the unit is longer than it needs
to be. If so, cut it to an appropriate length with the hacksaw,
and sand smooth the cuts.
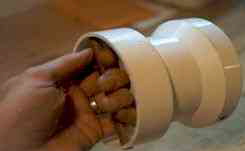
9 String the unit with at least 10 lb line. Practise casting
with a sinker. After use, the lure can be tucked into the tackle
compartment--still attached to the line--and the lid inserted to
hold all in place. This means there's nothing to hook you or your
pack during transit. |
 |
|
|